To secure and define your garden, yard, or property, installing a welded wire fence with T-posts is a common and efficient solution. An appropriately constructed fence can offer the required boundary and security, whether your goal is to keep animals out or pets within.
Welding wire prices are high and when you are putting up a fence made of welded wire, it will become costly. They give the wire fence substantial support and contribute to its long-term stability. We’ll walk through every step of how to install a welded wire fence with T posts in this comprehensive manual.
Required Material & Tools While Installing Welding Wire With T-Post Fencing:
A welded wire fence with T-posts is to be installed, so first gather the necessary equipment and supplies:
Materials Required For Installing Tposts
Some materials are required for the installation of welding wire with T Pots fencing. These materials should always to carried while installing:
- T-posts (appropriate length and gauge for your fence)
- Welded wire fence roll
- Wire clips or hog rings
- Fence staples
Tools Required While Installation
Before installation of t-posts begins, be sure to have the roper tools. Some important tools that are required:
- Post hole digger or auger
- Shovel
- Tape Measure
- Level
- String or twine
- Wire cutters
- Fence stretcher (optional, but recommended for larger fences)
- Hammer
- Gloves
- Safety glasses
Step-by-Step Installation Process of Welding Wire Fencing
Now that you have the tools and supplies you need, let’s know the installation process step-by-step.
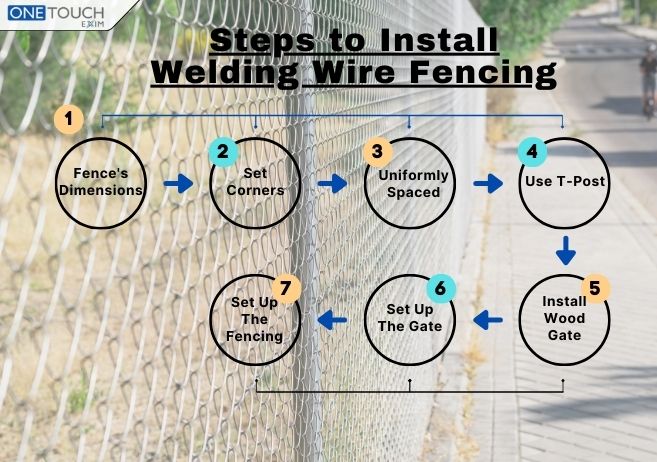
- Determine the Fence’s Dimensions
A successful installation of your fence depends on getting the measurements exactly right. The area you wish to fence in must be measured for both length and width. You can calculate how many posts and how much-welded wire you’ll need once you have these measurements. Giving an estimate of the time and effort needed to finish the project is also beneficial.
- Set the Corners
Place the corner posts in place. For each way the fence goes, a single post and a diagonal brace make up each corner. Corner braces might not be required if the wire is not stretched once it is installed. These bracing are only necessary for unstretched fences when the weight of the wire pulls the posts toward one another. They are designed to withstand the pressure of stretched wire. For further support, it is advised that corner braces be installed on all fencing.
- T-posts Should be Uniformly Spaced
The maximum distance between T post fencing is 12 feet. The likelihood that the posts won’t be able to carry the weight of the wire increases with longer spans. The ideal spacing, which will typically give stable fence support without the need for extra T-posts, is between 10 and 12 feet.
- Use T-Post Driving Tool
Put the T-post driving tool to use. To force a T-post into the ground, a unique weighted tube moves up and down the top section of the post. To drive the T-post into position, just raise and release the tool; both gravity and the tool’s weight will do the work. Until the flared ribs are below the surface, each post needs to be driven into the ground. To maintain a smooth and even top line when viewed from a distance, try to sink each T-post to the same depth.
- Setting Up the Fencing
Start rolling out the welded wire at a corner post as soon as your posts are in place and the materials are prepared. Roll it out from post to post along the fence line, keeping it erect. Avoid trying to install the fencing in one big length by rolling it out on the ground. The labor is harder as a result. Make sure the welded wire fence is taut and secure during installation by pulling it as taut as you can. As you wrap the wire around each post, make sure it is securely fastened. Make sure the roll stops at a post when you run out of material. Cut any excess fencing that extends past the post in the middle. Cut the extra wire with a pair of clippers.
Maintaining level fencing is essential while fastening the welded wire to the fence posts. Usually, the most significant posts in a line are the first two. It’s simpler to stay off-level once you get started. It’s quite difficult to get back on track if your first two posts are incorrect, though.
- Set Up The Gate
Not every fence has a gate, but if you do, I suggest putting in the gate last. The posts that hold up the gate ought to have been erected previously. The site is typically between a house or other substantial structure and a fence post, or between two fence posts. Measure the distance between the support posts and subtract roughly 2 inches to get the gate’s width. This provides space for the lock and hinges. There won’t be enough space for the gate to swing if you make it the exact distance between two posts.
Before attaching the hinges to the post, attach them to the gate. It is comparable to hanging a door within a frame. Verify that the hinges are positioned squarely and level. When you open and close the gate, if the hinges are even slightly misaligned, they will twist.
- Install Your Wood Gate
Once your dimensions are known, cut two 2x4s to the desired width, being sure to leave a few inches extra on each side for the gate to swing open and close. Next, measure the height of your desired gate and cut two more 2x4s to fit between the top and bottom boards, forming the shape of a box.
After the boards are arranged to form the shape of a door, the 2x4s are bolted together using L brackets on both sides of each corner. There are going to be eight brackets in all. Measure diagonally from one of the upper corners to the bottom corner that is opposite it. To fit in the corner of the gate, cut a board this length with 45-degree cuts on both ends. Fasten this board to the other side of the gate. The door to the gate is now constructed. Once the gate door is installed, you must drill holes for the latch and hinges so that the gate may be attached to the fence. Install the gate’s door after marking the fence posts where the latch and hinges are to be placed.
Conclusion
Adding a welded wire fence with T-posts to your property is a worthwhile undertaking that has several advantages. It can improve the look of your garden or yard overall and provides security and boundary definition. You can install a welded wire fence that is strong, long-lasting, and visually appealing with confidence if you follow the step-by-step instructions provided in this article.
Remembering that upkeep shortens the life of your welded wire fence is crucial. If you maintain regular inspections, promptly attend to any repairs, and keep the surrounding area tidy and debris-free, the fence will continue to function and look good. We are appreciative that you installed a welded wire fence with T-posts by carefully following our directions. We hope that this article has provided you with the knowledge and confidence you need to finish your task effectively.